Sunday, July 14, 2013

A Foray into Rings


If at first you don't succeed try try try again!  My foray into rings is a work in progress.  With each ring I make I am getting closer to my ideal design, but until then I am learning from my misdirections.


My plan was to do something similar to the bracelet design, so the supplies are roughly the same.  However I also learned that I needed to add a ring shaper to my tools for the future (something like the copper stick below)--for the time being I improvised with a couple of highlighters/fat pens and repeatedly trying the rings on.

Supplies (previously purchased at Beads on Fifth or off Ebay):
  • Wire cutter
  • 18 gauge wire (gold color copper; tarnish resistant craft wire from Bead Smith)
  • 28 gauge wire (14kt gold filled)
  • Semi-precious rough cut garnets
  • Rhodonite round pink beads
  • Rough cut dyed jade

Ring 1
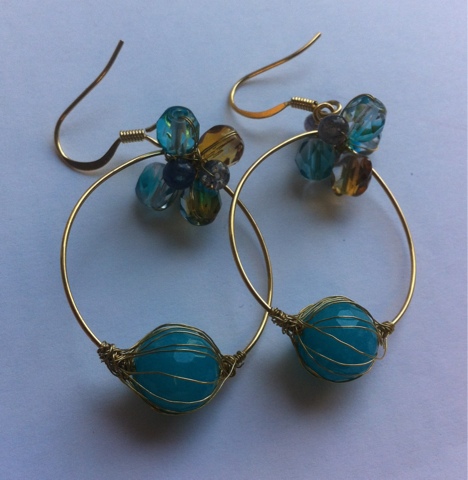
First I wound the 18 gauge wire so it overlapped 2 full times and then for about a cm 3 times.  Nexy I wound the 28 gauge wire around the doubled 18 gauge base.  I position where I anchored the three stone beads over the tripled up 18 gauge wire.  I think that creates a more streamlined look since that area of the ring is already distinct from the rest of the circle.  I found because the tripled up area was small that I had to do some extra wrapping of the beads to anchor them properly and avoid the ring base from continuously increasing in size.

The finished product, ring 1.  While I think it worked out well, in the future I'd like the reduce the "bulk" of the anchoring of the stones.  I much prefer a more streamlined look.  This may requiring looping through the bead twice to create a firm attachment.


Ring 2
This was my attempt to address the issue of expanding ring size.  This design contemplates a third full loop of the 18 gauge wire, but I decided to play around with the wrapping of the 28 gauge to create some interest.  I alternated between wrapping the top two and the bottom two wires.  While I do think this helped a lot with reducing risk of expansion, I am not in love with the resulting look.  It looks haphazard even though it was planned, in that I could each set top or bottom 28 gauge loops.

Another interesting lesson from ring 2, the use of a larger number of beads results in a "crown" look when worn.


Ring 3

My final product in this series.   For this ring I made a very conscientious effort to keep the ring size small and bulk minimal.  Towards this vein I decided to wrap the 18 gauge wire only once (with only partial doubling up).  In order to anchor the base so it would stay the same size I wrapped both ends of the 18 gauge (2 times) around the single loop and then wrapped the 28 gauge wire on top.  Some modeling with a matching shade of nail polish! But I won't be keeping this ring as it will be a belated birthday present from my friend Jane P. who has always encouraged my craftiness.


Saturday, June 8, 2013

Wire Wrapped Bracelet

Just because you are not the *BEST* (or even very good) at something doesn't mean you shouldn't do it.  The inner perfectionist in me that I'm almost certain I shook off sometime in 1st grade, still peeks out from under layers years of becoming more outgoing and confident.  In the interest of making this blog more of a personal betterment project, I will try to post a personal thought along with each craft / thrifty entry.

A perfect segue way into any craft project, as what I love about crafts is the process of making and the pride of completion.  If I or someone else can use it, then its reason for existence has been met.  It does not have to be the "best" craftsmanship or design, just something that "works".

I have been thinking for a little time now about bracelets and also expanding from my earring projects.  I don't wear much jewelry, and what I do wear is almost constantly on (a ring and a necklace).  So earrings and bracelets are areas where I find most flexibility for expansion.  A problem I have had with many is that many one size fits all bracelets run too large for my wrists.   For my first bracelet project I wanted to make something that I could slip on and off when I wanted to but did not fall off easily.

I decided to work on a design that was similar to the wire wrapped earrings I've gotten into making in the last year.  Perfect because I already had most of the materials.  I considered purchasing new bracelet sized wire that is made not to lose its shape, but decided just using thick wire wrapped twice would work just as well for my purposes, and better yet I had some among my supplies.  As it will be completely covered in the finished project I was not concerned with material content.

Supplies (previously purchased at Beads on Fifth or off Ebay):
  • Wire cutter
  • 18 gauge wire (gold color copper; tarnish resistant craft wire from Bead Smith)
  • 28 gauge wire (14kt gold filled)
  • 6 Semi-precious rough cut strung stones (garnets)
I "measured" the size I wanted by slipping the doubled wire on and off my wrist.  This came out to a wrist to bracelet circumference ratio of 5.5/7.5 (but will ultimately depend on your hand size and how much you can or how much you are willing to contort).
*TIP:  When the measuring tape has gone missing (or never existed in your too box) always helpful to keep string around to check measurements.

I looped the 18 gauge strand around twice with just over an inch overlap.  The nice part about 28 gauge wire is that where you start really just disappears into the project.  I began with a decent strand unwound from my spool and wound that end to completion, then started with the longer end.


I ended up using one continuous strand of the 28 gauge, which required some carefully wrapping (to avoid tangling)--this is probably not absolutely necessary because the wire blends nicely when doing tight wrapping but I generally like to do so and hopefully in future projects I will figure out some tricks to streamline the process.  A little before halfway through winding (make sure to regularly push the loops towards the already made loops), I threaded in a few beads and and anchored them with a few winds in between each for spacing.  I positioned the winding so the beads would fall along the wider 3 thickness portion of the 18 gauge band.  Then, I finished the project by winding the 28 gauge around the remaining half of the band.

Monday, March 26, 2012

Newest earring creations


After deciding to open up my own etsy store (http://www.etsy.com/shop/emilushop) I've finally gotten around to making and photographing enough "inventory" for a grand opening or more accurately announcing to my friends.

My latest creations below. I'm currently quite intrigued with wire wrapping.
 

Friday, January 20, 2012

Nail Polish...an introduction

For many years I bit my nails (terrible habit!!!), so I was not much of one for polishes, but with the advent of Duane Reade carrying essie and opi, I began to be lured in.  While there is certainly nothing wrong with drugstore lines and I still buy them from time to time, there was something  One of my favorite polishes to this day is Essie Mademoiselle. Its a pretty shade of pink that goes on sheer for a "french manicure" effect.  It leaves a light pink tinge but is close enough to natural that chipping is not too noticeable.  This picture was taken in natural light.  I have on ULTA base coat, two layers of mademoiselle and Essie shine top coat.  I think the base and top coats both work well, although honestly I am not a diehard fan a specific brand.  Essie generally retails for $8, but I have found periodically retailers like beauty.com and ulta.com will have sales like 3 for 2.  
Since then I have broaden the types of polishes I sample and am a big fan of deeper colors and glitters.  My current favorite brands are Butter London and Julep. I blame the nail subforum at purseforum!  The lovely members have open me up to the world of polishes of many shades, finishes and brands.  I think my #1 nail polish goal is to find a glitter polish that finishes very smooth--I hate bumps.  I find while wet n' wild and milani (two drugstore brands) have a lovely assortment of colors to play with at reasonable colors, the finish is so sandpaper that even two layers of top coat doesn't fix the issue.  Last month I picked up this gift package of holiday glitters from the Butter London website.  At $17 a piece these polishes are not cheap, even the value "holiday trio" pack price was a $42.  But I loved all the colors and while not perfectly smooth they do dry far less bumpily than other brands I have tried.  I purchased during their friends and family sale (20% in early December), so that helped a little with the cost at least!


I can also thank the nail subforum for introducing me to Julep.  Another premium brand, these slim bottles run for $14 a piece (20% discount for mavens). The maven loyalty program is a fun way to get a sample of polishes (typically 2-3 and a few other nail related gifts) for $20 monthly.  Introductory boxes can be had for $5 (coupons are easy to find, currently MAVEN5), in case you are interested in a maven box this is my referral link (you can earn "free" boxes with referrals, although at least thus far I am okay with the price).  So far I am happy into my foray into Julep.  The colors that I like have gone on very well.  But I'll admit I did get the pink color penelope in my mystery box (separate promotion that they ran in December), and I hate it!  But I hate all opaque light pinks so that was a big of a given.  I can't wait to get my February box.  Although I'm technically a boho chic gal, I opted to switch to It Girl because I'm loving both the copper and dark blue. While not cheap, Julep is often running promotions.  Also I was able to score further discounts by applying my livingsocial $50 for $102 of product deal (no longer available).  I am sometimes overwhelmed by the volume and underwhelmed by the variety of offerings of the various daily deal / coupon sites, but I was pleasantly surprised by julep because I had been thinking about trying it.

Truth be told I'm not a big OPI fan.  The color variety is fantastic, but I don't really have the application skills to deal with the thick consistency I have found the OPI brand to have.  I've heard it varies color to color, but everyone has felt thicker and less manageable than my essie.  On the other hand, that may translate to fewer coats for those more polish-dextrous than I.  I also happily will select OPIs when at the nail salon which goes on fine when you have a skilled technician. Recommended retail price is $8.50 (i.e. at Duane Reade), but Sephora by OPI runs for $9.50.  Drugstore.com however carries it for $8.00, as does randomly Nordstrom Rack (if your local Rack carries polish at all).